Shower Wall Panels: Waterproof Solutions That Work
Yes, PVC wall panels are 100% waterproof — the material itself is completely impermeable to water, and the tongue-and-groove or click-fit joints create a continuous sealed surface that prevents water reaching the wall behind. This makes PVC panels ideal for shower enclosures, around baths, and in wet rooms. Unlike tiles (where the grout joints are the waterproof weak point), a properly installed PVC panel wall has no joints through which water can penetrate. The shower area is the most demanding location in any bathroom for waterproofing, and PVC panels handle it without the ongoing grout maintenance that tiles require.
The shower enclosure is where wall finish failures cause the most damage. Water hits the walls at pressure, runs down the surface, and pools at junctions. If that water penetrates the wall finish — through deteriorating grout, cracked tiles, or failed sealant — it causes damp, mould, and structural damage that can cost hundreds or thousands of pounds to repair. PVC wall panels provide a waterproof barrier that does not degrade with water exposure, making them the most reliable long-term solution for shower walls.
Why PVC Panels Are Waterproof
The Material
PVC-U (unplasticised polyvinyl chloride) is inherently impermeable. Water molecules cannot pass through the material. This is the same reason PVC is used for waste pipes, gutters, and underground drainage — it is engineered for permanent water contact.
The Joints
Panel joints use one of two methods:
- Tongue and groove: One panel’s tongue slots into the adjacent panel’s groove, creating an overlapping joint that channels water down the face rather than allowing it to penetrate
- Click-fit: A locking mechanism snaps panels together, creating a tight joint with no gap
Neither system relies on grout, sealant, or any degradable material to maintain its waterproof integrity. The joint itself is waterproof by design.
The Weak Points (And How to Address Them)
No system is perfect. The potential water ingress points on a panel installation are:
| Location | Risk | Solution |
|---|---|---|
| Panel edges (where panels meet trims) | Water can enter behind the trim | Seal with mould-resistant silicone |
| Bath/shower tray junction | Water pools at the junction | Continuous bead of silicone sealant |
| Pipe penetrations | Gaps around pipes | Pipe collars + silicone seal |
| Panel-to-ceiling junction | Condensation can run behind panels | Ceiling trim with silicone bead |
| Corner joints | Minor gaps possible | Internal corner trims + silicone |
With proper edge sealing, a PVC panel shower enclosure is completely watertight.
Shower Panel Options Compared
PVC panels are not the only shower wall option. Here is how they compare:
| Feature | PVC Panels | Ceramic Tiles | Acrylic Panels | Laminate Panels |
|---|---|---|---|---|
| Waterproof? | Yes (material + joints) | Partially (grout degrades) | Yes (material) | Partially (edges vulnerable) |
| Installation time | 4–6 hours | 2–4 days | 2–4 hours | 4–6 hours |
| Cost (shower area only) | £100–300 | £200–800 | £200–600 | £150–400 |
| Grout required? | No | Yes | No | No |
| Maintenance | Wipe clean | Regrout every 5–10 years | Wipe clean | Wipe clean |
| Design options | Good (marble, stone, plain) | Unlimited | Limited (usually plain) | Good (printed designs) |
| DIY-friendly? | Yes | No (skilled tiler needed) | Moderate | Yes |
| Durability | 15–25 years | 20–40 years (grout fails sooner) | 10–15 years | 10–15 years |
| Impact resistance | Good | Moderate (tiles chip) | Good | Poor (dents easily) |
Installing Panels in a Shower
Surface Preparation
The wall behind the shower panels should be:
- Dry — fix any existing damp issues before panelling
- Flat — panels bridge minor imperfections but not major undulations. Use battens to create a flat surface if needed
- Sound — remove loose plaster, flaking paint, or damaged plasterboard
The Two Installation Methods
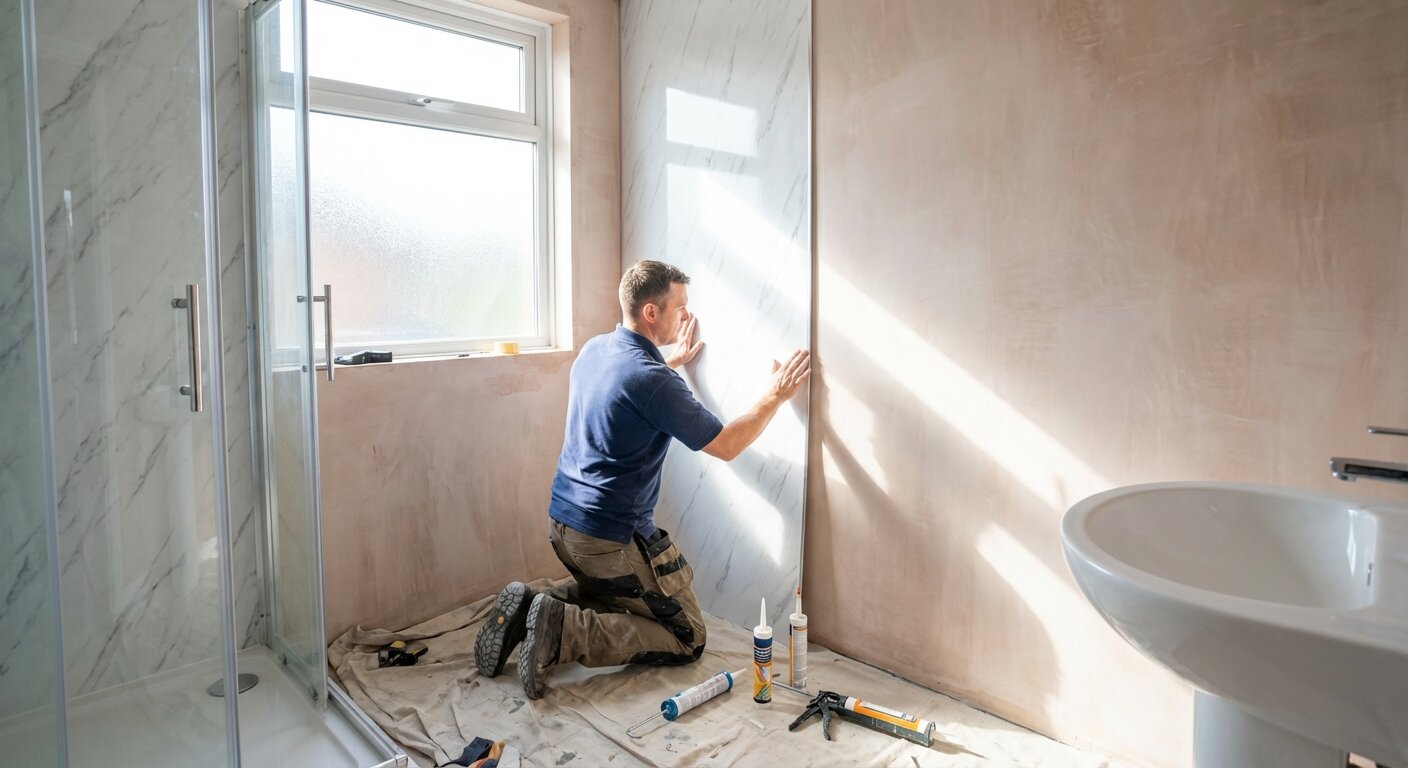
Method 1: Direct Adhesive (Most Common)
Apply panel adhesive in vertical beads to the back of each panel and press onto the prepared wall. This is the fastest method and works well on flat, sound surfaces.
For shower areas specifically:
- Use a high-grab, moisture-resistant adhesive designed for PVC panels
- Apply adhesive more generously than on non-wet areas — full coverage rather than spaced beads
- Ensure the adhesive makes contact across the full panel surface
Method 2: Battens (Recommended for Wet Rooms)
Fix horizontal timber battens to the wall at 400–600 mm centres, then screw or staple panels to the battens through the tongue edge.
Advantages for shower areas:
- Creates an air gap behind the panels, allowing any moisture to evaporate rather than being trapped
- Provides a flat surface regardless of the wall condition
- Allows panels to be removed and replaced individually without damaging the wall
Sealing: The Critical Step
In a shower, every edge and junction must be sealed with mould-resistant silicone sealant:
- Shower tray junction — continuous bead along the entire length where panels meet the tray
- Internal corners — bead inside each corner trim
- External edges — where panels meet the shower screen, door, or other materials
- Pipe and fixture penetrations — around shower valves, shower heads, and any other fittings
- Top edge — where panels meet the ceiling or upper wall
Use a high-quality sanitary-grade silicone with anti-fungal properties. Cheap silicone degrades faster and is more prone to mould growth.
Panel Profiles for Showers
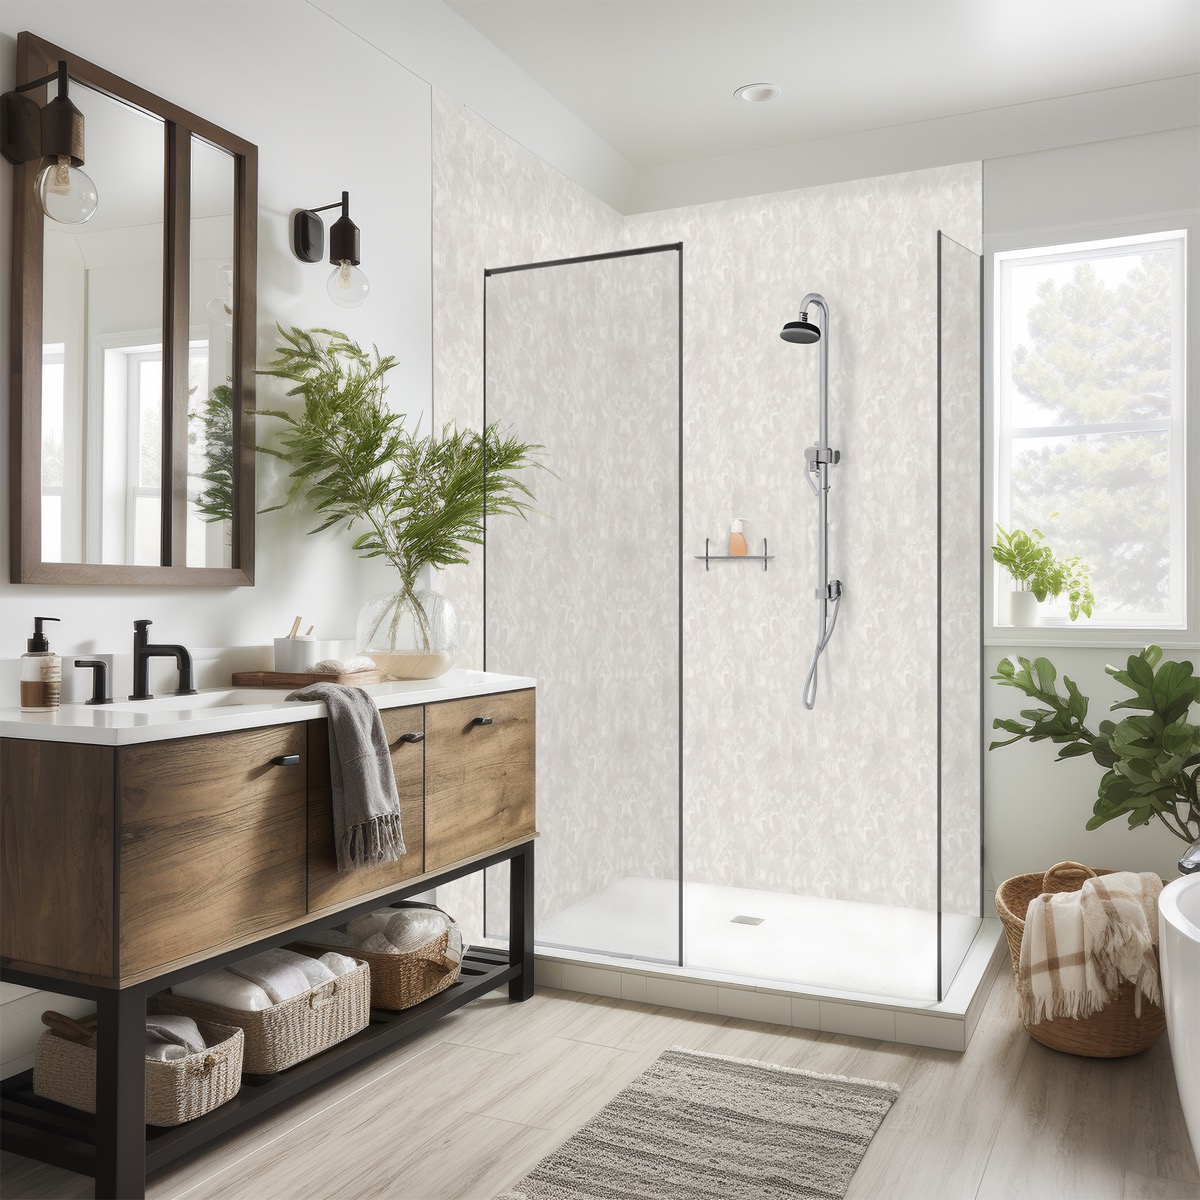
Full-Height Panels
The standard approach: panels run from the shower tray to the ceiling, covering the full height. This provides maximum waterproof coverage and a clean, unbroken appearance.
Three-Quarter Height
Panels cover the wet zone (typically 1,800–2,000 mm above the tray), with paint or a different finish above. This can reduce cost but creates an additional junction that needs sealing.
Feature Panel
One wall in a contrasting or premium finish (e.g., marble-effect embossed panel), with the remaining walls in a complementary plain colour. This creates visual interest without the cost of premium panels on every wall.
Maintenance and Cleaning
PVC shower panels need minimal maintenance:
Daily/Weekly Cleaning
- Wipe down after showering with a squeegee or dry cloth (prevents limescale build-up)
- Clean with a standard bathroom spray and soft cloth
- Rinse with clean water
Monthly Deep Clean
- Apply a limescale remover to affected areas (follow product instructions)
- Clean silicone sealant beads — apply mould remover if any surface mould is visible
- Check sealant integrity — any gaps or peeling sealant should be resealed
What NOT to Use
- Abrasive pads or scouring powder — scratches the panel surface
- Bleach (neat) — can discolour some panel finishes
- Solvent-based cleaners — can damage PVC
- Sharp tools for limescale removal — scratches create sites for future limescale adhesion
Common Shower Panel Mistakes
| Mistake | Consequence | Prevention |
|---|---|---|
| No silicone at shower tray junction | Water enters behind panels | Always seal this junction |
| Using standard (non-mould-resistant) silicone | Silicone goes black within months | Use sanitary-grade anti-fungal silicone |
| Panels not reaching into the tray recess | Gap between panel and tray | Cut panels to tuck behind the tray lip (or seal thoroughly) |
| Forgetting to seal pipe penetrations | Water enters around shower valve | Seal every penetration with silicone |
| No air gap in wet room installations | Trapped moisture causes damp | Use batten method with air gap |
Frequently Asked Questions
Are PVC wall panels waterproof?
Yes, 100%. PVC-U is inherently impermeable to water, and the tongue-and-groove or click-fit joints create a continuous sealed surface. With proper silicone sealing at edges and junctions, a PVC panel shower enclosure is completely watertight.
Can I use wall panels in a shower instead of tiles?
Yes. PVC wall panels are a direct replacement for shower tiles. They are faster to install, cheaper, require no grout, and provide better long-term waterproofing because there are no grout joints to deteriorate.
How long do shower panels last?
15–25 years with normal use and basic cleaning. The panels themselves do not degrade with water exposure. The silicone sealant at edges should be inspected annually and replaced every 5–10 years (a quick, inexpensive job).
Do shower panels go mouldy?
The panels themselves do not — PVC is non-porous and mould cannot colonise the surface. Silicone sealant beads can develop surface mould over time (as with any bathroom sealant), but this is easily cleaned or the sealant replaced. There is no grout to go mouldy.
Can I install shower panels over existing tiles?
Yes, provided the tiles are firmly fixed. Clean the tile surface, apply panel adhesive, and press panels onto the tiles. This is the fastest shower renovation method — no tile removal, no replastering, no drying time.
Related Kalsi Products
- Wall Panelling Range — full range for bathrooms and showers
- Smooth Panels — clean, easy-clean finishes
- Embossed Cladding — premium textured finishes
- Installation Guides — shower panel fitting instructions
- Wall Panelling Calculator — calculate quantities for your shower